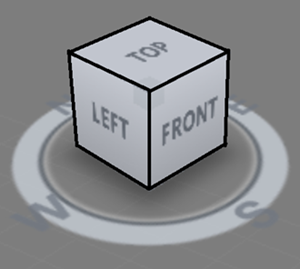
3Ds Max - View Cube
The View Cube 3D navigation control provides visual feedback of the current orientation of a viewport. You can easily see any side of any object. Such as front, back, left, etc...

In 3ds Max, the ViewCube is a navigation tool that helps users interactively rotate the scene to view models from different angles. It’s typically located in the upper-right corner of the viewport, allowing for quick access to predefined views, such as top, bottom, front, back, left, and right.
Here’s a breakdown of its functionality:
Main Features:
- 3D Navigation: You can click and drag the ViewCube to rotate the scene around.
- Predefined Views: Clicking on the faces, edges, or corners of the cube will snap the view to a corresponding orthographic or isometric view.
- Home View: You can define a "Home" position that you can always return to by clicking the small home icon next to the cube.
- Roll Control: Right-clicking on the cube brings up options like rotating 90 degrees in any direction or configuring other settings.
- Visibility and Settings: You can toggle the visibility of the ViewCube or change its size, opacity, and behavior from the viewport settings.
How to Use:
- Rotating the View: Click and drag any part of the cube.
- Snapping to Views: Click directly on the faces, edges, or corners for an exact view.
- Zooming: Use the mouse scroll wheel or zoom tools to zoom in or out while using the cube.
Customization:
You can customize the ViewCube settings by going to Customize > Preferences and then selecting the ViewCube tab. This allows you to adjust size, location, or even disable it if you prefer using other navigation methods.